Tuesday, May 17, 2011
Concatenating row values in Transact-SQL
Nice article for concatenating row values in SQL: Click Here

Friday, November 12, 2010
Thursday, June 3, 2010
Wednesday, May 26, 2010
Excute SSIS package from .NET application
Fowlloing code is used to excute SSIS package from web or windows applications.
First we need to add reference Microsoft.SqlServer.ManagedDTS to the project ( Right click on References. Click on 'Add Reference'. It will pop up Add reference window. select Microsoft.SqlServer.ManagedDTS under .NET components and click on OK).
HTML Source:
<html xmlns="http://www.w3.org/1999/xhtml" >
<head runat="server">
<title>Excute SSIS package from .NET application</title>
</head>
<body>
<form id="form1" runat="server">
<div>
<asp:Button ID="btnExcute" runat="server" OnClick="btnPackage_Click" Text="Excute Package" />
</div>
</form>
</body>
</html>
C# Code:
protected void btnPackage_Click(object sender, EventArgs e)
{
string filename = "C:/Documents/Projects/TestPackage/bin/Deployment/test.dtsx";
Application app = new Application();
Package pckg = null;
try
{
pckg = app.LoadPackage(filename, null);
DTSExecResult result = pckg.Execute();
}
catch (Exception ex)
{
throw ex;
}
finally
{
pckg.Dispose();
}
}
First we need to add reference Microsoft.SqlServer.ManagedDTS to the project ( Right click on References. Click on 'Add Reference'. It will pop up Add reference window. select Microsoft.SqlServer.ManagedDTS under .NET components and click on OK).
HTML Source:
<html xmlns="http://www.w3.org/1999/xhtml" >
<head runat="server">
<title>Excute SSIS package from .NET application</title>
</head>
<body>
<form id="form1" runat="server">
<div>
<asp:Button ID="btnExcute" runat="server" OnClick="btnPackage_Click" Text="Excute Package" />
</div>
</form>
</body>
</html>
C# Code:
protected void btnPackage_Click(object sender, EventArgs e)
{
string filename = "C:/Documents/Projects/TestPackage/bin/Deployment/test.dtsx";
Application app = new Application();
Package pckg = null;
try
{
pckg = app.LoadPackage(filename, null);
DTSExecResult result = pckg.Execute();
}
catch (Exception ex)
{
throw ex;
}
finally
{
pckg.Dispose();
}
}
Tuesday, March 9, 2010
Search tables by using column name in SQL Server
Following query is used to find all tables and views which contain specific column name.
SELECT [TABLE NAME]=SYSOBJECTS.NAME,
[COLUMN NAME]=SYSCOLUMNS.NAME,
[DATA TYPE]=SYSTYPES.NAME,
[COLUMN LENGTH] = SYSCOLUMNS.LENGTH
FROM SYSOBJECTS
JOIN SYSCOLUMNS ON SYSOBJECTS.ID = SYSCOLUMNS.ID
JOIN SYSTYPES ON SYSCOLUMNS.XTYPE=SYSTYPES.XTYPE
WHERE SYSCOLUMNS.NAME ='COLUMN NAME'
You need to give column name
SELECT [TABLE NAME]=SYSOBJECTS.NAME,
[COLUMN NAME]=SYSCOLUMNS.NAME,
[DATA TYPE]=SYSTYPES.NAME,
[COLUMN LENGTH] = SYSCOLUMNS.LENGTH
FROM SYSOBJECTS
JOIN SYSCOLUMNS ON SYSOBJECTS.ID = SYSCOLUMNS.ID
JOIN SYSTYPES ON SYSCOLUMNS.XTYPE=SYSTYPES.XTYPE
WHERE SYSCOLUMNS.NAME ='COLUMN NAME'
You need to give column name
List of all Tables, Views and their columns in selected SQl database
Following query gives complete list of tables and views in a SQL database.
USE [DATABASE NAME]
GO
SELECT * FROM INFORMATION_SCHEMA.COLUMNS
Following is the sample query to get column names and data types for selected table:
SELECT
COLUMN_NAME 'COLUMN NAME',
DATA_TYPE 'DATA TYPE',
COULMN_DEFAULT 'COLUMN DEFAULT'
FROM INFORMATION_SCHEMA.COLUMNS
WHERE TABLE_NAME = 'TABLE NAME'
USE [DATABASE NAME]
GO
SELECT * FROM INFORMATION_SCHEMA.COLUMNS
Following is the sample query to get column names and data types for selected table:
SELECT
COLUMN_NAME 'COLUMN NAME',
DATA_TYPE 'DATA TYPE',
COULMN_DEFAULT 'COLUMN DEFAULT'
FROM INFORMATION_SCHEMA.COLUMNS
WHERE TABLE_NAME = 'TABLE NAME'
Tuesday, February 16, 2010
Duplicate rows in a table
Following code is used to find duplicate rows in a Table, which doesn't have primary key. You can use either GROUP clause or HAVING clause to get all duplicate rows.
HAVING Clause:
SELECT COLUMN_NAME
FROM TABLENAME
GROUP BY COLUMN_NAME
HAVING COUNT(*) >1
GROUP BY Clause:
SELECT * FROM (
SELECT COLUMN_NAME, COUNT(COLUMN_NAME) AS CNT
FROM TABLENAME
GROUP BY COLUMN_NAME) AS A
WHERE CNT>1
HAVING Clause:
SELECT COLUMN_NAME
FROM TABLENAME
GROUP BY COLUMN_NAME
HAVING COUNT(*) >1
GROUP BY Clause:
SELECT * FROM (
SELECT COLUMN_NAME, COUNT(COLUMN_NAME) AS CNT
FROM TABLENAME
GROUP BY COLUMN_NAME) AS A
WHERE CNT>1
Monday, October 5, 2009
Enable version settings in a SharePoint list
You can enable Version Settings for SharePoint lists so that they track versions of the items they contain. You can specify the number of versions to track and also view prior versions of items in the list. When version tracking is enabled for the list, each time the data in a row changes, Windows SharePoint Services creates a new version of that row.
To enable version tracking, you need the Manage Lists permission on the Windows SharePoint Services server. If you are not able to change the version settings, Check with your SharePoint Site adminstrator about your permisions.
To enable version tracking, you need the Manage Lists permission on the Windows SharePoint Services server. If you are not able to change the version settings, Check with your SharePoint Site adminstrator about your permisions.
- Go to the List and click on Settings
- On the Settings menu , click List Settings
- Under General Settings, click Versioning settings.
- On the List Versioning Settings page, in the Item Version History section, under Create a version each time you edit an item in this list?, click Yes.
- To limit the number of versions to retain, select Keep the following number of versions, and then type the number of versions to retain.(If you limits the number of versions that it stores, the oldest versions are permanently deleted when the limit is reached. They are not sent to the Recycle, So need to make sure do you need old versions or not)
Show/Hide "Create Folder" in Lists in SharePoint
This article explains how to Show or Hide New Folder options in lists or documents in SharePoint.
When created a List(Lists can be documents, project task, e.t.c) in the Sharepoint, by default it will give the option Create Folder under New task under that list. For hiding the Create New Folder option, First, you should be owner to the site and then follow the following steps..
When created a List(Lists can be documents, project task, e.t.c) in the Sharepoint, by default it will give the option Create Folder under New task under that list. For hiding the Create New Folder option, First, you should be owner to the site and then follow the following steps..
- Go to the List
- Click on Settings
- Select List Settings
- Click on Advanced Settings, Which is under genaral setting
- Check "NO" option for - Display "New Folder" command on the New menu?
Wednesday, September 23, 2009
Maintain Scroll Position in ASP.NET 2.0
This article explains, how to maintain current page scroll position across page postback events.
When working with large data in gridview, Scroll down the page and doing some thing that causes a postback, Then page automatically set back to the top position rather than staying at the current scroll position.
Smartnavigation (Smartnavigation = true) feature was using in .NET 1.X frame work. But It had only worked in IE browser.
It has been resolved in .NET 2.0 by using MaintainScrollPositionOnPostback page directive attribute.
This attribute can add to the pages in three ways.
1) Set Globally ( Set it in Web.Config in root level)
<system.web>
<pages theme="DefaultSkin" maintainScrollPositionOnPostBack="true" >
</pages>
</system.web>
2) Page Level Scrolling Mainatanance
In ASP.NET Page:
<%@ Page Language="C#" MaintainScrollPositionOnPostback="true" %>
3) Set in Programatically:
Import the Name space System.Web.UI, like in C#:
using System.Web.UI;
Set MaintainScrollPositionOnPostback true in Page load
protected void Page_Load(object sender, EventArgs e)
{
if (!IsPostBack)
{
Page.MaintainScrollPositionOnPostBack = true;
}
}
When working with large data in gridview, Scroll down the page and doing some thing that causes a postback, Then page automatically set back to the top position rather than staying at the current scroll position.
Smartnavigation (Smartnavigation = true) feature was using in .NET 1.X frame work. But It had only worked in IE browser.
It has been resolved in .NET 2.0 by using MaintainScrollPositionOnPostback page directive attribute.
This attribute can add to the pages in three ways.
1) Set Globally ( Set it in Web.Config in root level)
<system.web>
<pages theme="DefaultSkin" maintainScrollPositionOnPostBack="true" >
</pages>
</system.web>
2) Page Level Scrolling Mainatanance
In ASP.NET Page:
<%@ Page Language="C#" MaintainScrollPositionOnPostback="true" %>
3) Set in Programatically:
Import the Name space System.Web.UI, like in C#:
using System.Web.UI;
Set MaintainScrollPositionOnPostback true in Page load
protected void Page_Load(object sender, EventArgs e)
{
if (!IsPostBack)
{
Page.MaintainScrollPositionOnPostBack = true;
}
}
Thursday, August 27, 2009
Using windows MessageBox in ASP.NET
I have seen in the forums, lot of people are asking for using Windows MessageBox in ASP.NET. It's pretty simple. Just you need to Add System.Windows.Forms namespace to references. Follow these steps:
1) Right Click on References in your solution explorer
2) Click on Add References. Add References window will be open
3) Under .NET tab select System.Windows.Forms, Click Ok. Now it added to your reference library
4) Import the namespace System.Windows.Forms in your page
C#: using System.Windows.Forms;
VB.NET: Import System.Windows.Forms
5) Now you can use MessageBox.Show();
1) Right Click on References in your solution explorer
2) Click on Add References. Add References window will be open
3) Under .NET tab select System.Windows.Forms, Click Ok. Now it added to your reference library
4) Import the namespace System.Windows.Forms in your page
C#: using System.Windows.Forms;
VB.NET: Import System.Windows.Forms
5) Now you can use MessageBox.Show();
Thursday, August 20, 2009
Ceating Indexes on views in SQL 2005
When I was creating Index on view, I got the following error.
"Cannot create index on view 'v_testview' because the view is not schema bound. (Microsoft SQL Server, Error: 1939)". Following link helped me to figure out the solution.
http://www.mssqltips.com/tip.asp?tip=1610
It may hellpfull to you also..
"Cannot create index on view 'v_testview' because the view is not schema bound. (Microsoft SQL Server, Error: 1939)". Following link helped me to figure out the solution.
http://www.mssqltips.com/tip.asp?tip=1610
It may hellpfull to you also..
Saturday, August 8, 2009
Restore existing database in SQL 2005
1)Open Microsoft SQL Server Studio, Login with your SQL Credentials or using Windows Authentication mode.
2)Create New Database with name “DatabaseName”, Set path for MDF and LDF files on your local computer.
3) Right click on the created databse("DatabaseName") in Object Browser Window and select Task->Restore->Database option. You will get restore database wizard opened.
4) On General Menu, select radio option of “From Device”, then select backup file from browse file option.
5) After successfully selection of Backup file, Goto Options menu from left navigation pane and Mark “Overwrite Existing Database” to true.
6) Click OK
If you want to create database diagrams for restored database, you will get the following error.
Error: Database Diagram Support Objects cann't be installed because this database doesn't have a valid owner.
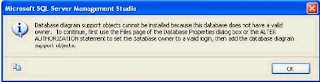
Solution: By default restored database consider system login ID as database owner. We need to change the database ownership manually, back to the owner that originally created the database when diagrams created. To accomplish this run the following query in SQL query analyzer
--Replace "DatabaseName" with your database name
USE DatabaseName--(change this Database name)
GO
--Following query will change owner name
EXEC sp_changedbowner 'sa';
GO
You can look at the current wner to the database by running the following query
EXEC sp_helpdb;
GO
2)Create New Database with name “DatabaseName”, Set path for MDF and LDF files on your local computer.
3) Right click on the created databse("DatabaseName") in Object Browser Window and select Task->Restore->Database option. You will get restore database wizard opened.
4) On General Menu, select radio option of “From Device”, then select backup file from browse file option.
5) After successfully selection of Backup file, Goto Options menu from left navigation pane and Mark “Overwrite Existing Database” to true.
6) Click OK
If you want to create database diagrams for restored database, you will get the following error.
Error: Database Diagram Support Objects cann't be installed because this database doesn't have a valid owner.

Solution: By default restored database consider system login ID as database owner. We need to change the database ownership manually, back to the owner that originally created the database when diagrams created. To accomplish this run the following query in SQL query analyzer
--Replace "DatabaseName" with your database name
USE DatabaseName--(change this Database name)
GO
--Following query will change owner name
EXEC sp_changedbowner 'sa';
GO
You can look at the current wner to the database by running the following query
EXEC sp_helpdb;
GO
Debug problem in older version Visual Studio(VS2003 & VS2005) with IE 8
I had done lot of research to fix my debug problem in Visual Studio 2005. Finally, I got the solution.
Problem: Debug is not working for VS 2005 with IE8
Solution:
Problem: Debug is not working for VS 2005 with IE8
Solution:
- Go to Start
- Select Run
- Enter RegEdit (this opens Registry Editor Window)
- Go Thru HKEY_LOCALMACHINE\SOFTWARE\Microsoft\Internet Explorer\Main
- Check for the key TabProcGrowth, if you haven't find add new DWORD with the name TabProcGrowth
- Set the value to 0
Reason: This problem is because of opening of multiple instances in IE8 browser. IE8 has a feature called "Loosely-Coupled Internet Explorer (LCIE)", which isolates the Internet Explorer frame and its tabs into separate processes. Because of this seperate process between IE frame and Tabs, Older versions of VS debuggers are getting confused to connect to the exact process.
Hope this will fix your problem.
Wednesday, July 29, 2009
Use nvarchar(max) for ntext in MS SQL 2005 and later versions
Error:
The ntext data type cannot be selected as DISTINCT because it is not comparable
Prob: Union fails, If a table contains nText datatype field
Answer: Use nVarChar(MAX)(This works only SQL 2005 and Above versions)
Similarly, use VarChar(MAX) for TEXT, varbinary(max) for image
The ntext data type cannot be selected as DISTINCT because it is not comparable
Prob: Union fails, If a table contains nText datatype field
Answer: Use nVarChar(MAX)(This works only SQL 2005 and Above versions)
Similarly, use VarChar(MAX) for TEXT, varbinary(max) for image
Tuesday, July 14, 2009
Conenction in tns ORA file for conencting to Oracle data base
For conencting to Oracle database, First you need to create connection string in TNS ORA file.
1) go to C:\ORANT\NETWORK\ADMIN
2) Open tns names.ora file
3) Modify your variable in the following string
EXTPROC_CONNECTION_DATA =
(DESCRIPTION =
(ADDRESS_LIST =
(ADDRESS = (PROTOCOL = TCP)(HOST = HOSTNAME)(PORT = 1521))
)
(CONNECT_DATA =
(SERVICE_NAME = PLSExtProc)
)
)
1) go to C:\ORANT\NETWORK\ADMIN
2) Open tns names.ora file
3) Modify your variable in the following string
EXTPROC_CONNECTION_DATA =
(DESCRIPTION =
(ADDRESS_LIST =
(ADDRESS = (PROTOCOL = TCP)(HOST = HOSTNAME)(PORT = 1521))
)
(CONNECT_DATA =
(SERVICE_NAME = PLSExtProc)
)
)
Connecting to Databases from SSIS COnnection manager
Couple of guys asked me about conencting to ACCESS from SSIS. I thought, It's betetr to put in my blog..
1) Right click in Connection manager window(Which is appear at the bottom of the visual studio)
2) Select New OLEDB Connection
3) You will get "Configure OLEDB Connection Manger:" window. Click on NEW button
4) Select Provider, What ever database you want to connect
Ex: use OLEDB\SQL Native Client for connecting to SQL, Native OLEDB\Microsoft JEt4.0 OLEDB Provider for connecting to ACCESS, Microsoft OLEDB Provider for Oracle for Oracle e.t.c..
5)Select the file if data base is Access, Eneter server name if you want to connect to SQL, For conencting the Oracle data base you need to use Server variable which is used in tns ORA file(For creating connection string in tns ora file Click here).
6) Click on Test Conenction to amke sure whether it's conencted or not.
7) Click Ok
1) Right click in Connection manager window(Which is appear at the bottom of the visual studio)
2) Select New OLEDB Connection
3) You will get "Configure OLEDB Connection Manger:" window. Click on NEW button
4) Select Provider, What ever database you want to connect
Ex: use OLEDB\SQL Native Client for connecting to SQL, Native OLEDB\Microsoft JEt4.0 OLEDB Provider for connecting to ACCESS, Microsoft OLEDB Provider for Oracle for Oracle e.t.c..
5)Select the file if data base is Access, Eneter server name if you want to connect to SQL, For conencting the Oracle data base you need to use Server variable which is used in tns ORA file(For creating connection string in tns ora file Click here).
6) Click on Test Conenction to amke sure whether it's conencted or not.
7) Click Ok
Wednesday, June 17, 2009
Creating new SSIS package got error: Failed to save package file with error 0x8002802B Element not found
Problem:
Error when creating new SSIS package:
Failed to save package file 'C:\documents and settings\local settings\temp\tmp172.tmp" with error 0x8002802B Element not found

Solution:
1) From the start menu, click run
2) enter the code: regsvr32 %windir%\system32\msxml6.dll
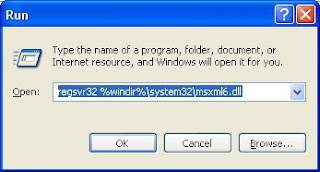
3) click enter
4)RegSvr32 pop up will come up, Click OK
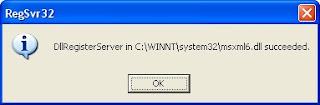
Error when creating new SSIS package:
Failed to save package file 'C:\documents and settings\local settings\temp\tmp172.tmp" with error 0x8002802B Element not found

Solution:
1) From the start menu, click run
2) enter the code: regsvr32 %windir%\system32\msxml6.dll

3) click enter
4)RegSvr32 pop up will come up, Click OK

Friday, February 20, 2009
Compare two complete ROWS( all columns of each row) in two seperate TABLES
If you have two separate tables with same primary key and want to check the updates in the other table,using BINARY_CHECKSUM would be the best answer. But need to careful about column data types. Column Data types shouldn't be text, ntext, image, XML, and cursor.
Here is T-SQL query to compare two rows from different table:
Take ORDERS1 as one table and ORDERS2 as other table
SELECT ORDERS1.PRIMARYKEY_ID
FROM
(SELECT PRIMARYKEY_ID, BINARY_CHECKSUM(*) AS CHECKVALUE FROM ORDERS1) AS CHECKSUMTABLE1
INNER JOIN
(SELECT PRIMARYKEY_ID, BINARY_CHECKSUM(*) AS CHECKVALUE FROM ORDERS2) AS CHECKSUMTABLE2
ON CHECKSUMTABLE1.PRIMARYKEY_ID= CHECKSUMTABLE2.PRIMARYKEY_ID
WHERE CHECKSUMTABLE1.CHECKVALUE <> CHECKSUMTABLE2.CHECKVALUE
Here is T-SQL query to compare two rows from different table:
Take ORDERS1 as one table and ORDERS2 as other table
SELECT ORDERS1.PRIMARYKEY_ID
FROM
(SELECT PRIMARYKEY_ID, BINARY_CHECKSUM(*) AS CHECKVALUE FROM ORDERS1) AS CHECKSUMTABLE1
INNER JOIN
(SELECT PRIMARYKEY_ID, BINARY_CHECKSUM(*) AS CHECKVALUE FROM ORDERS2) AS CHECKSUMTABLE2
ON CHECKSUMTABLE1.PRIMARYKEY_ID= CHECKSUMTABLE2.PRIMARYKEY_ID
WHERE CHECKSUMTABLE1.CHECKVALUE <> CHECKSUMTABLE2.CHECKVALUE
Subscribe to:
Posts (Atom)